¶ XPWA
¶ Accessing XPWA from Back Office
The video shows how to access XPWA from Back Office
¶ Rotate Monitor
The video demonstrates how to rotate a monitor using XPWA after logging in.
¶ Set Monitor Resolution
The video demonstrates how to set the monitor resolution using XPWA after logging in.
¶ Back Office
¶ Domain Creation
Creating a Back Office Domain can be of two types:
Domain 0 = A main domain
This creation can only be done by system administrators of fabbricadigitale.
Subdomain = The creation of a subdomain within the main domain
This action must be performed while logged into the main domain with a user who has administrative privileges.
¶ Finalize a New Player in Back Office
When a new player is introduced to Back Office as a new device, it cannot be directly published until it is finalized.
To finalize the new device, simply enter the edit mode, complete the required fields, and give it a name.
For the device to be usable and publishable in Back Office, an environment must be created (association between Device and Environment Template). In many domains, auto-registration is enabled, which automatically makes this association.
In domains with multiple templates, this association must be made manually based on the environment template you want to use.
After completing this operation, the player will be publishable.
¶ Upload Content
The Back Office allows various types of content to be uploaded, which can then be used in Shows.
The video demonstrates how to upload content to Back Office.
Unless specified otherwise, Back Office enforces image size limits in the database:
width 7680 pixels
height 7680 pixels
If you upload images that exceed these dimensions, an error will be returned indicating "the image exceeds the maximum allowed resolution."
Content may require additional elements, such as being visible in a Video Portal and having tags to facilitate searching or selection via Dynasets.
¶ YouTube
It is also possible to play YouTube videos or live streams on players. To do this, upload the YouTube video link as web content.
You can load the link by setting YouTube player parameters. Simply follow these steps:
- Video link to display: https://www.youtube.com/live/Y_gsJrefyRQ
- Extract the video ID Y_gsJrefyRQ
- Load the link as **https://www.youtube.com/embed/Video-ID?parameters
- In this example, the link to load for autoplay would be: https://www.youtube.com/embed/Y_gsJrefyRQ?autoplay=1
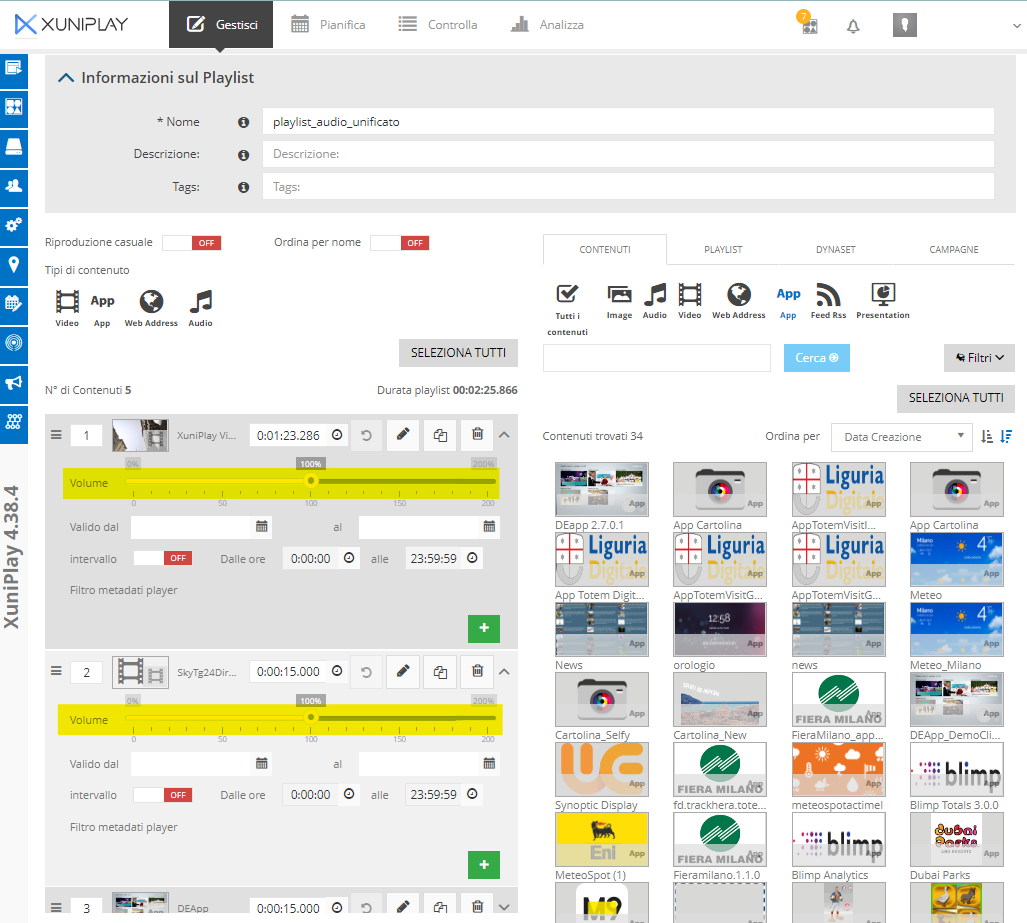
¶ Create a Playlist
For easier content management, you can organize content into Playlists. These playlists can then be used within Shows.
An essential feature of playlists is that the same playlist, with its characteristics, can be used in multiple Shows; this means that if you modify the playlist, the change will automatically apply to all Shows containing it, so you only need to modify it once rather than in each Show.
Within the playlist, individual content can be given validity settings or playback discriminators using tags.
The video demonstrates how to create a Playlist in Back Office.
The «Unified Audio Volume Management for Playlists» feature introduced in Xuniplay allows you to prevent volume differences between two contents played back-to-back.
You can adjust the playback volume of content directly within the Playlist. Each Playlist entry for Video, Audio, App, Web content (and subtypes) includes a slider to control audio volume.
The slider only appears if the content has audio; it will not be present if the content has no audio.
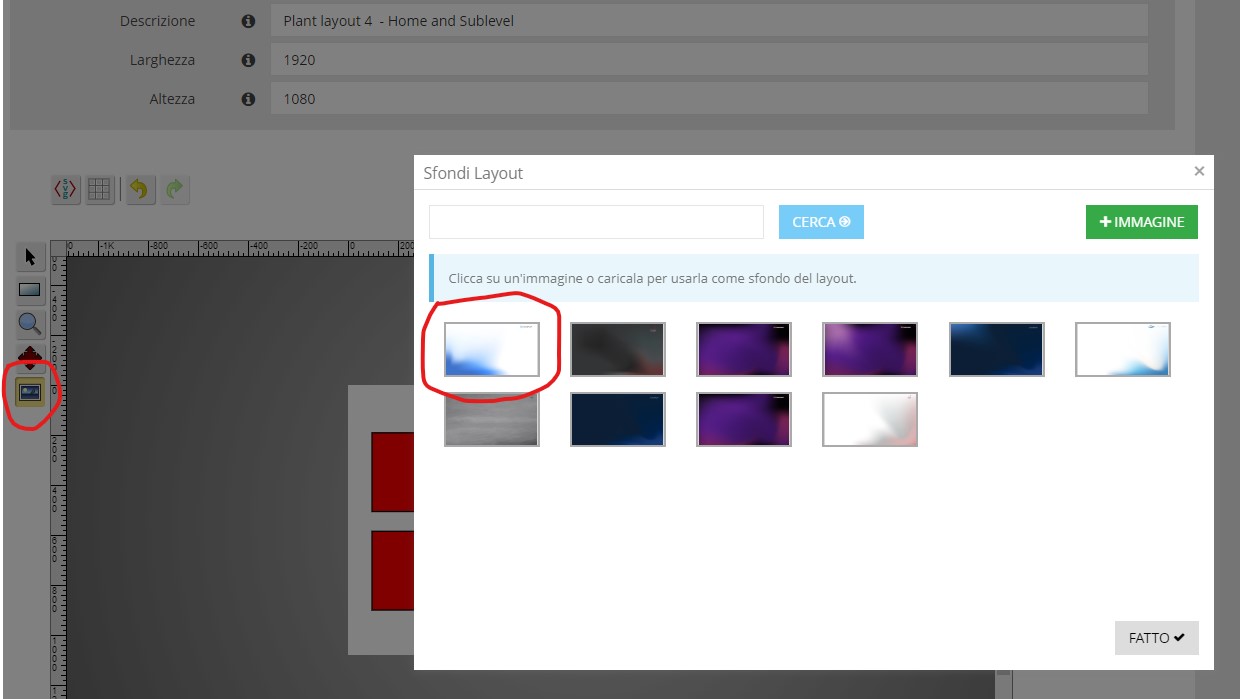
¶ Layout Creation
The Layout is the design that defines how the content will be structured for display.
Layouts of any type and size can be created based on specific needs.
A desired background image can also be added to the Layout.
¶ Environment Template Creation
The Environment Template is the identifying feature. For simplicity, we can think of it as the template used to create various environments. It also helps create separations to avoid programming errors, as different Shows are linked to specific environment templates.
It’s like having different T-shirt sizes (templates), and the Totems are the people who are assigned based on their size.
¶ Environment Creation
The Environment is the identifier for a specific Totem.
It is the basic unit that usually contains one player, although it can be more complex (consisting of multiple players) depending on the environment template used to create it.
¶ Show Creation
The Show is a collection (created through the Back Office) of various contents and the ways they should be displayed, which is then downloaded to the player.
Each Show is associated with an environment template, which acts as a safeguard to prevent human error. Once the Show is created, it can only be published in environments that match the specified type at the time of creation.
The Show is built by dragging and dropping various elements.
¶ Show Publication
Once the Show creation is complete, the next step is publication—this involves instructing the Back Office to download the Show to players, specifying its validity and parameters.
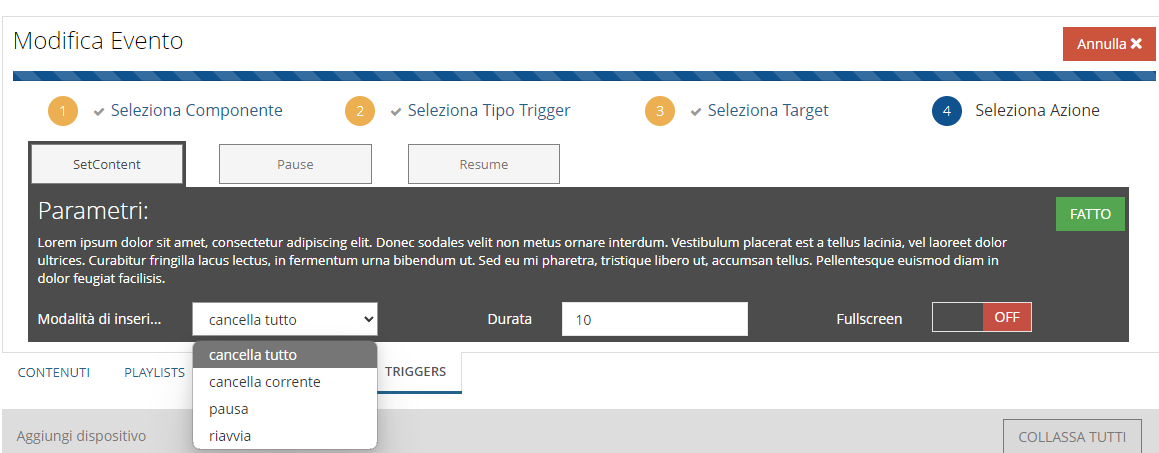
¶ Trigger
A trigger is a feature that can be created in Show, allowing a specific action to occur when a particular condition is met.
In the video example, it demonstrates how to create a trigger that, upon activation of certain content in one area of the Layout, displays an image in fullscreen in another area.
For content without its own duration (such as images or web content), the duration for which it should remain visible can be specified. For content with its own duration (such as videos), the value set in the trigger will be ignored, and the content’s own duration will be used.
Fullscreen can be enabled or disabled; if enabled, regardless of the layout area we specified for the content, it will be displayed in fullscreen. If the fullscreen function is not activated, the content will be displayed in the area we specified.
Below is an explanation of the different insertion modes:
Clear All: Clears all content in the timeline of the zone and plays only the trigger content.
Clear Current: Removes the current content playing in the zone and plays the trigger content. After the trigger ends, it resumes with the next content.
Pause: Pauses the content, and after the trigger, resumes from the point where it was paused.
Restart: Realigns the zone with the execution of the playlist in that zone, as if the trigger had not been executed and the playlist had continued to play.
¶ Default Publication
You can set up a default publication at the domain level, associating a default agenda (consisting of at least one show) with a specific environment template.
This feature allows player publication to be automated upon installation. By automatically associating a new player with a specific environment template and setting a default agenda for that template, new players will automatically publish once installed.
¶ Delivery Monitoring
Delivery monitoring is the section where you can track the publication process and verify its progress. Besides current publications, it is possible to review past ones, whether they succeeded or failed.
The key requirement for a successful Delivery is that the player is online.
¶ Streaming Playback
To play a streaming flow on players, you only need to know the stream URL. With this information, you can:
- register a VideoStreaming content (in the Video category) in the Content Library
- add the content to a Show, or to a Playlist within a Show
- schedule the Show on the desired Players
Registering a VideoStreaming content
¶ Deleting a Device
When deleting a Device, it is recommended to delete the environment it belongs to as well, to avoid leaving obsolete elements in the Back Office. However, if you are replacing a device, there is no need to delete the environment.
¶ Automatic Republish
Automatic republish is a feature that can be activated on individual Back Office domains, allowing the Back Office to automatically trigger the republish of a Show (on all players it is published on) after a modification.
This simplifies the management of changes: if you want to add content to multiple players, you can simply add the content to the Show or playlist available on those players, and the Back Office will automatically publish it (after the set time) without further human intervention.
This option, when enabled on the domain, eliminates the need for manual publications upon Show modification.
When you need to make a change to a Show or playlist, simply make the change, and the system will automatically republish it wherever the Show is present.
This option prevents manual republishing and reduces redundancy in the agenda stack with repeated and unnecessary Shows.
If the player is marked with a A, the system will automatically handle republishing.
If the player is marked with a M, republishing will need to be performed manually.
¶ Auto-Registration
Auto-registration is a feature that allows you to set up domain rules whereby a player, upon first registration, automatically acquires certain attributes. For example, you can specify that each player registers as a certain device, such as a generic totem.
In addition to the device type, a specific environment template can also be associated. This way, no manual activity is needed; a player presenting itself to the Back Office will already have all the desired characteristics for publication.
¶ Remotely View the Player
Using Back Office, you can remotely view the player. If an interactive schedule is published, you can also interact remotely.
¶ General
¶ How to choose the right image to install on the player
This is the procedure on how to choose the correct and most updated image for your player/settopbox:
The most important thing to understand is what type of processor is mounted on your device, you have many ways to do this:
-
In case the settopbox is a brend new player
-
If the player you need to install was purchased after 2016 until now you can choose the last image available that is called
"Player Ubuntu 24.04 Intel Nuc 7-13, Asus PN64 UEFI boot - 05/11/2024"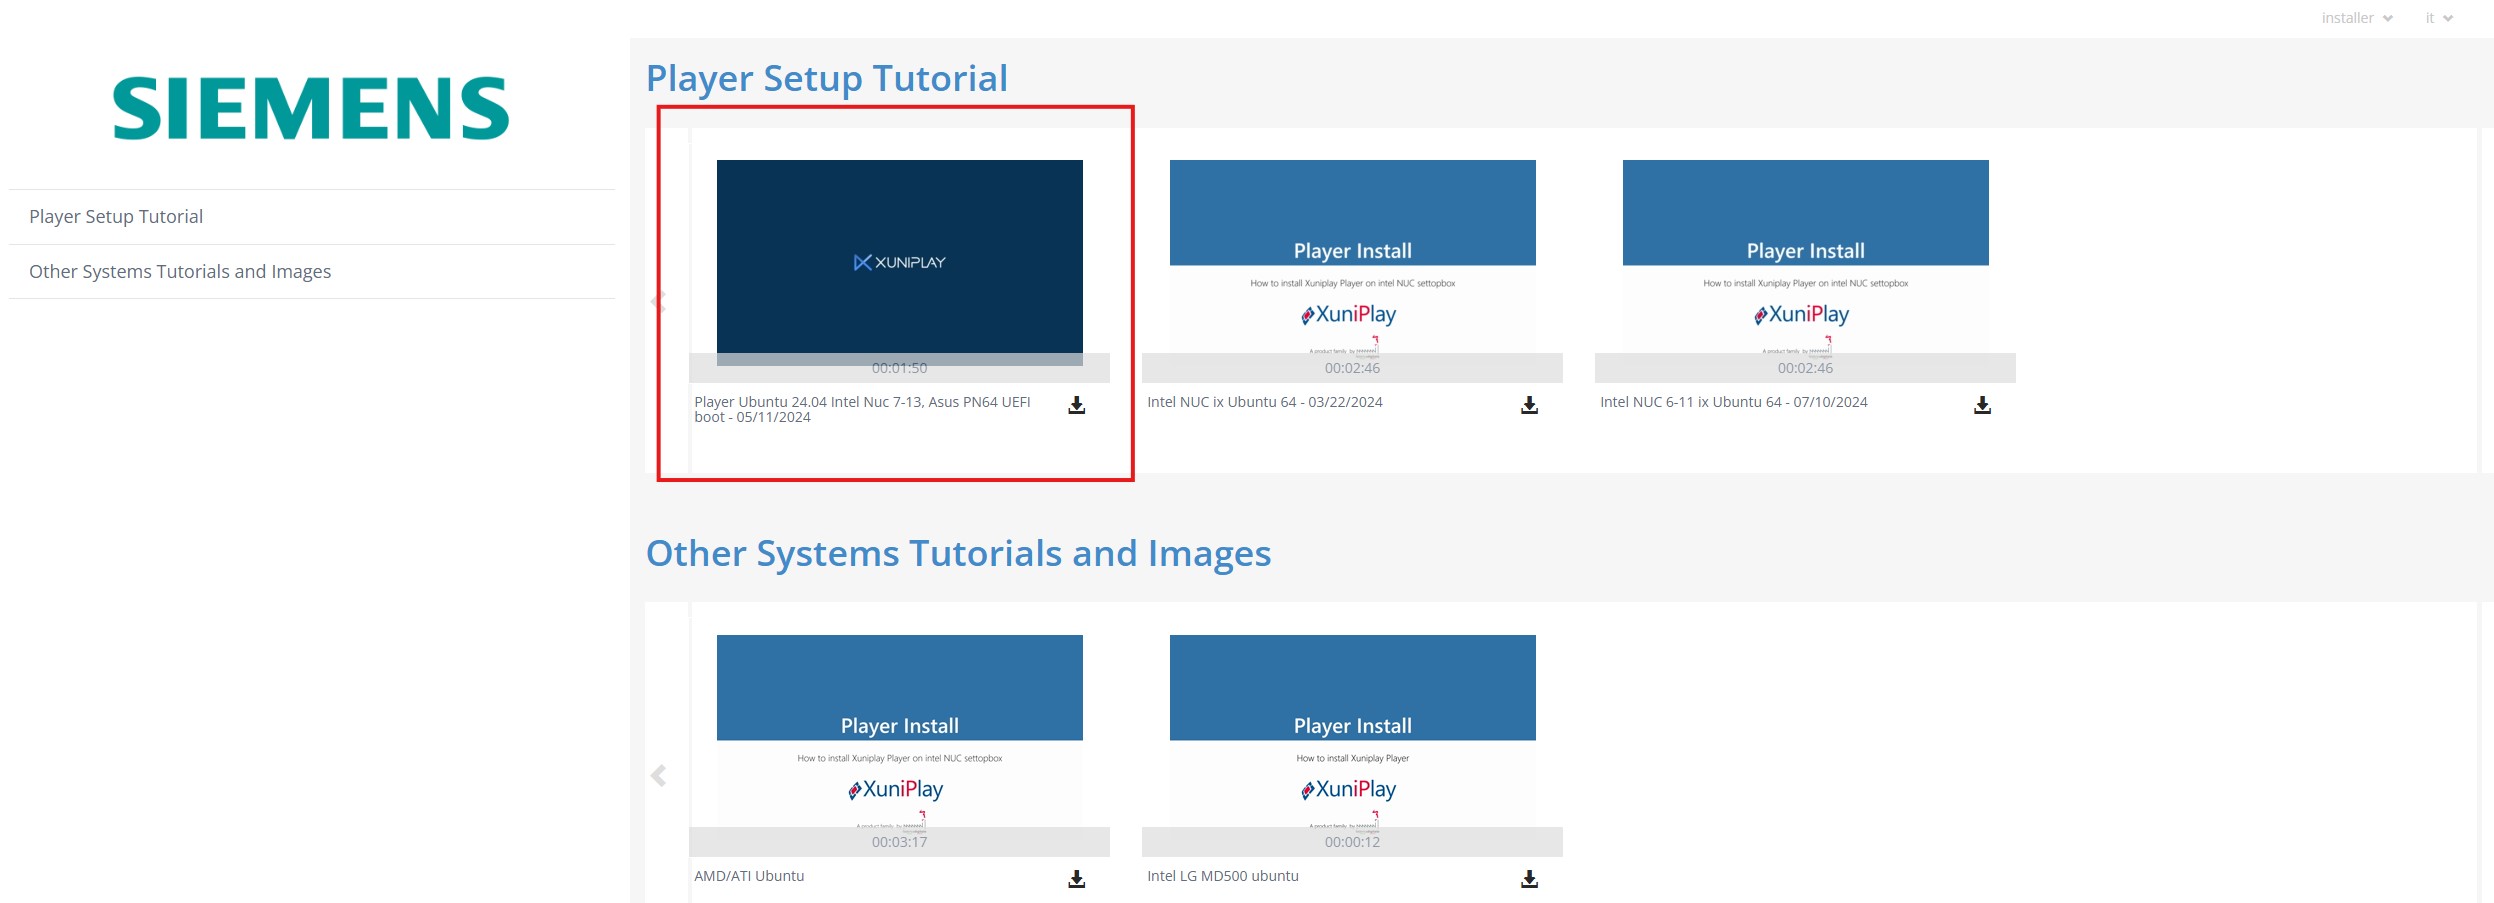
-
If the player was bought before 2016 or you are not shure, you must to check online what version of CPU is mounted in it (by visiting the producers site or simply google it). As you can see in the below exemple this type of NUC is a 6th Gen processor
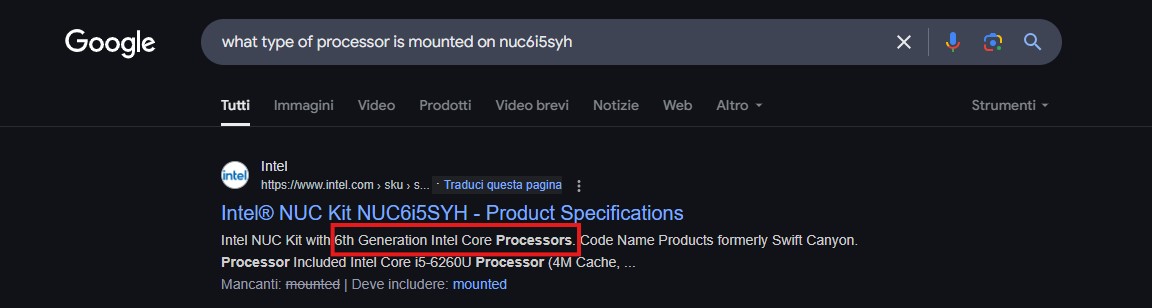
In this case you have to use the 6th gen compatible image wich is"Intel NUC 6-11 ix Ubuntu 64 - 07/10/2024"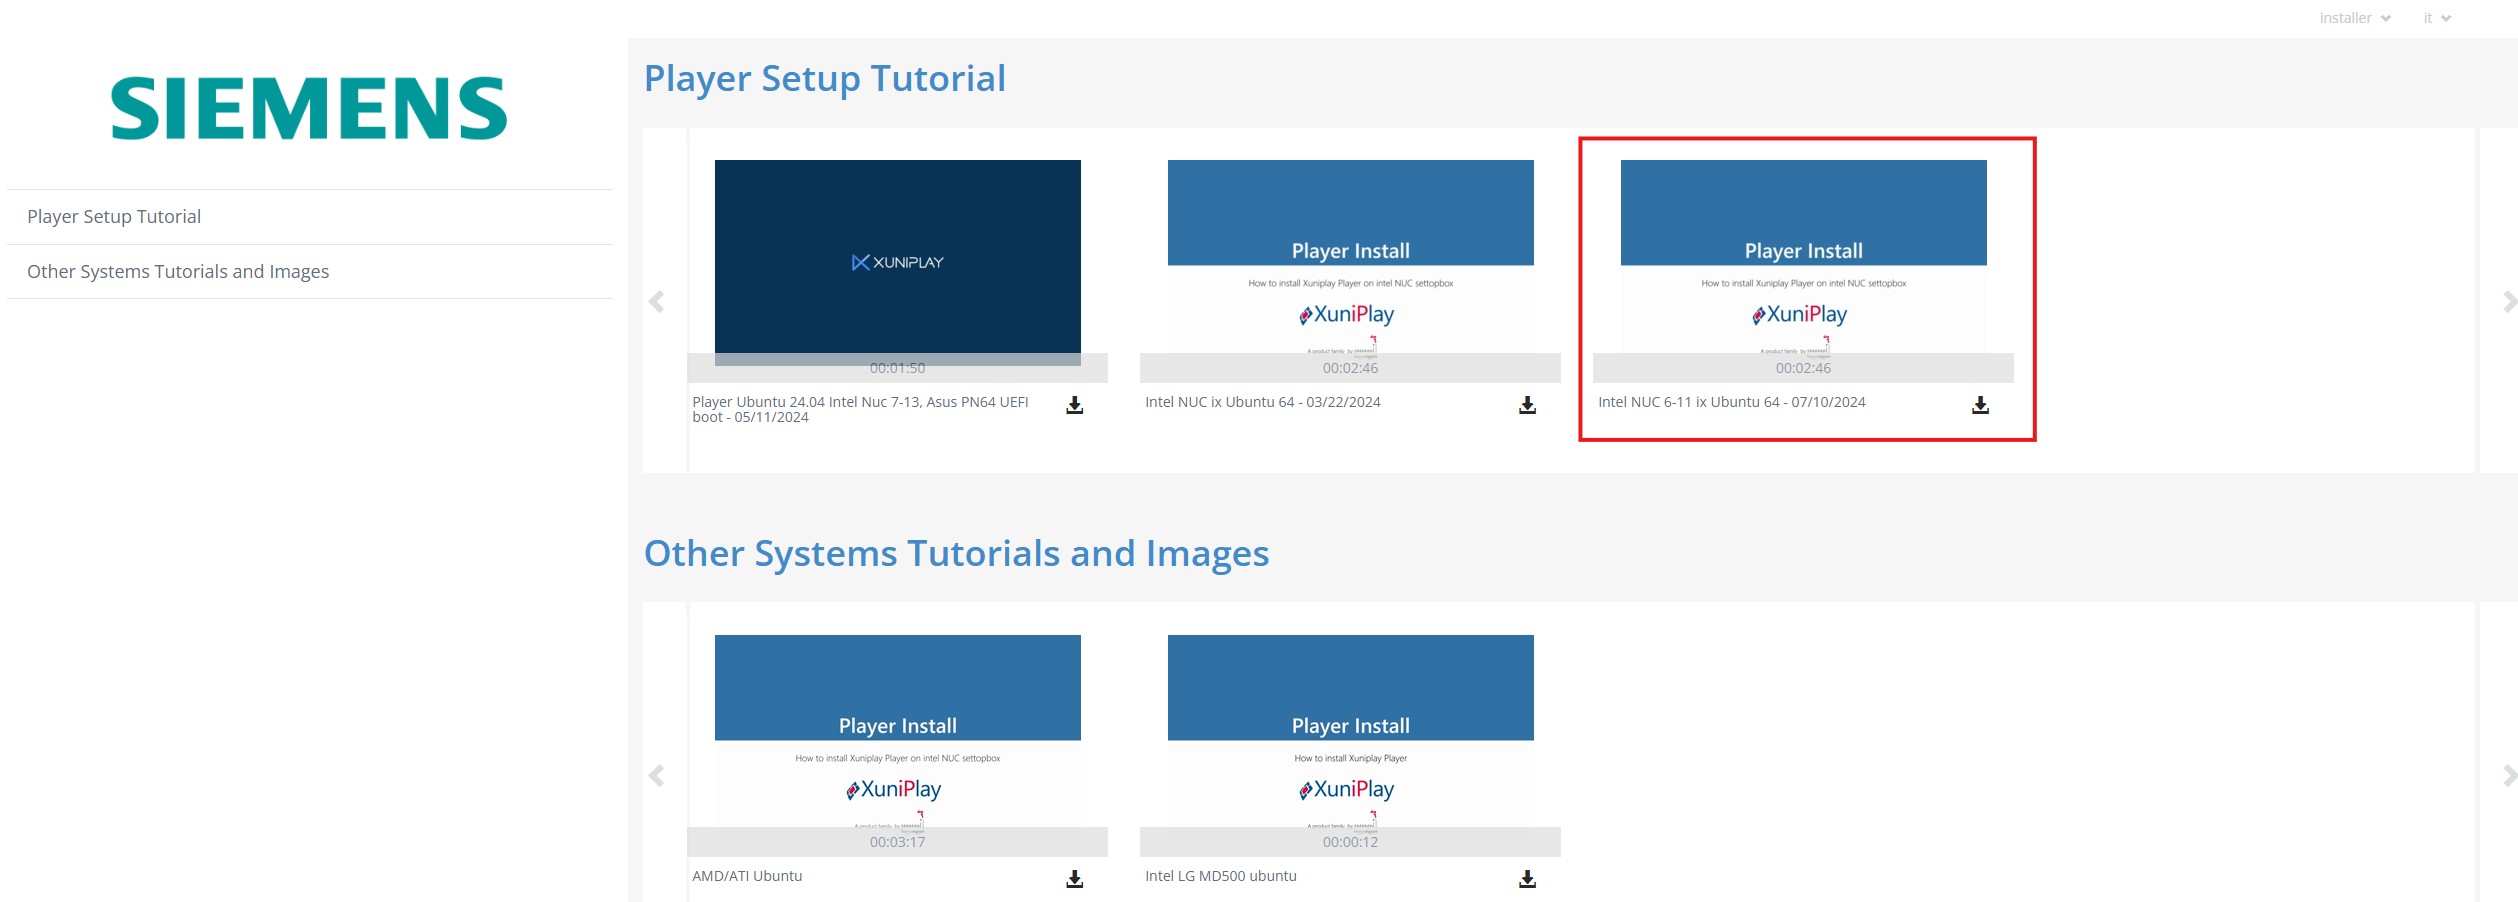
-
-
In case the settopbox has already been installed previously with xuniplay
- If the player is present in the backoffice you can check directly there the version of the processor
by click on the player (even if it's offline) you can see the CPU MODEL
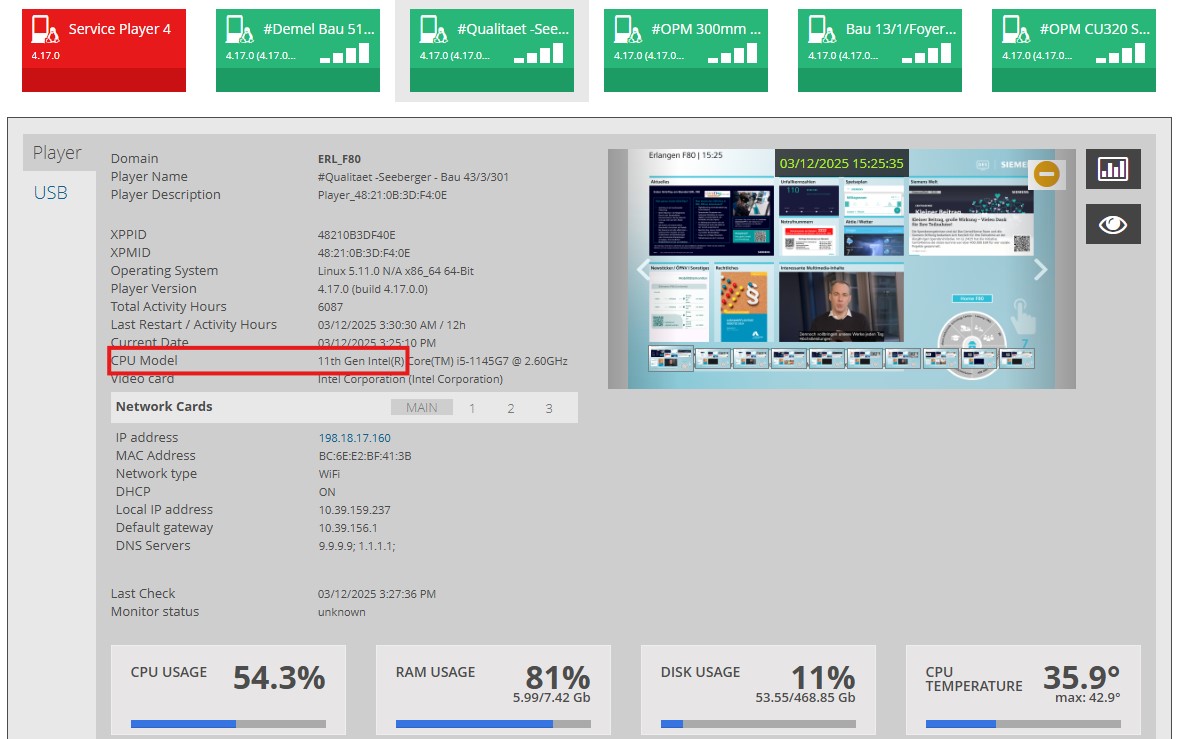
if the model is from the 7th gen and above, you must install the image "Player Ubuntu 24.04 Intel Nuc 7-13, Asus PN64 UEFI boot - 05/11/2024" if the model is from the 6th gen and below, you must install the image "Intel NUC 6-11 ix Ubuntu 64 - 07/10/2024"
- If the player is present in the backoffice you can check directly there the version of the processor
¶ How to create or get a New Installation Key
In this topic you learn how to create or get a New Installation Key for your players
First thing to know is that each domain has its own unique installation key that registers the player automatically.
-
Enter in the backoffice and click on the XP Setup gear then click on Installation Key
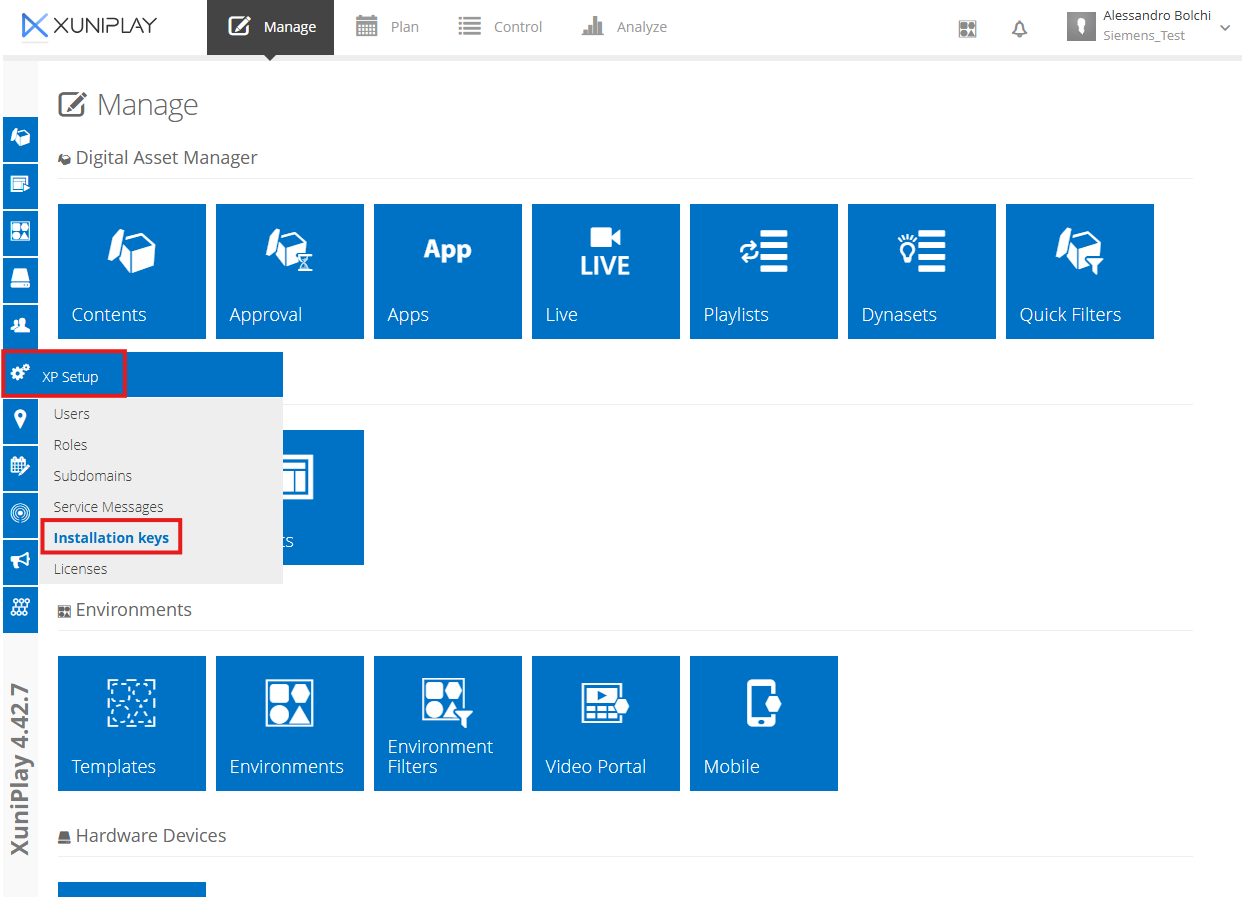
-
If you see the installation key skip to the point 4, if you don't see any installation key you can create it on your own by clicking on the "+ INSTALLATION KEY" button
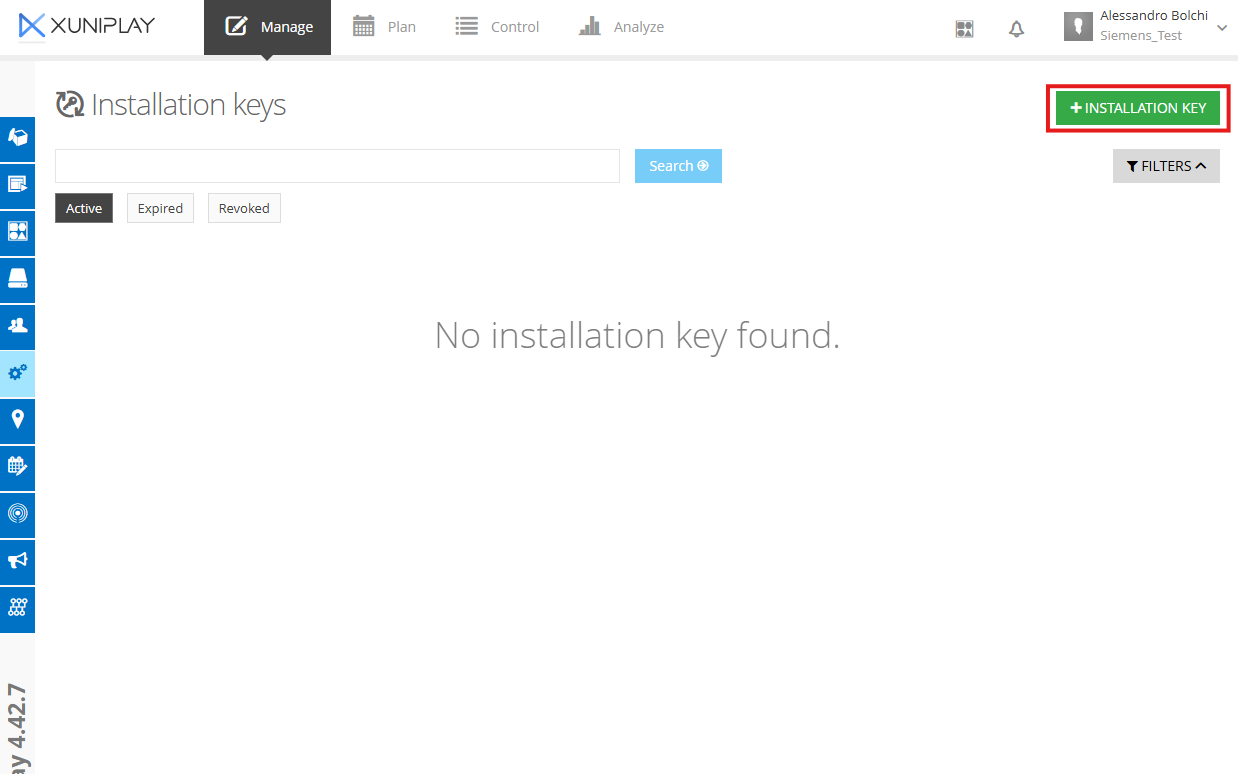
You don't need multiple installation key, to avoid mistakes please keep only one installation key per domain (you can edit the mail or delete the old installation key in case the installer user changes over time)
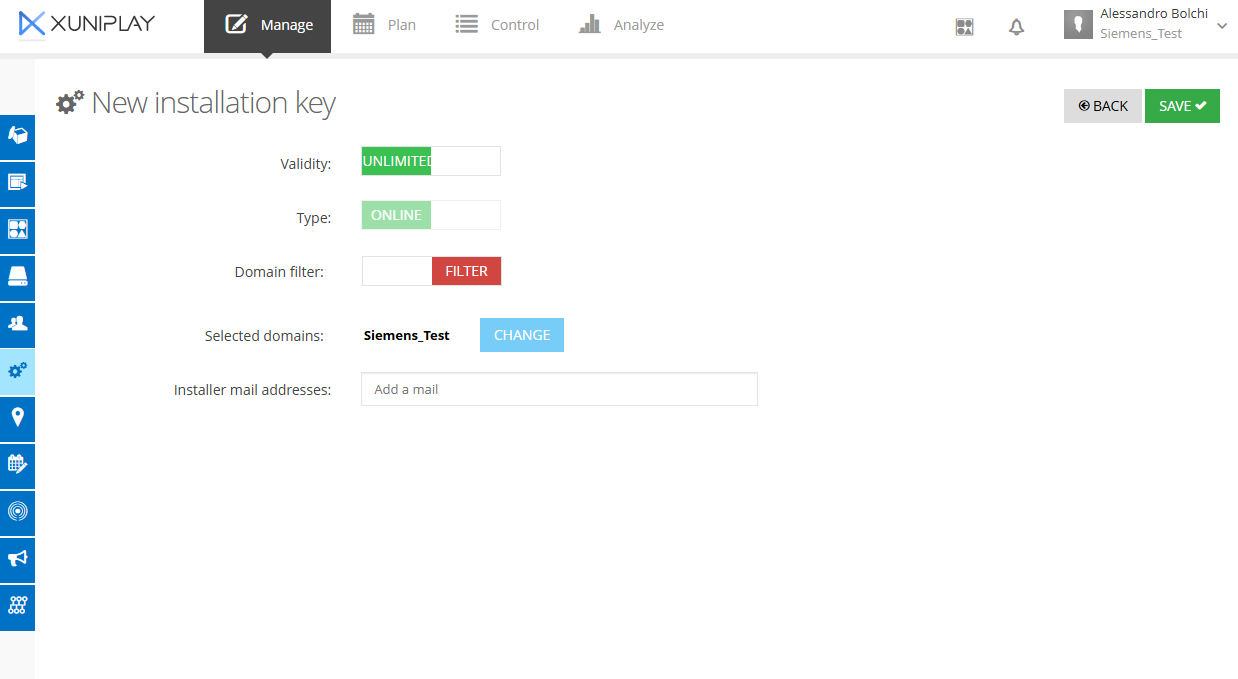
- Here you can set some parameters as you prefer but to avoid mistakes and problem we suggest you to leave all the settings to default; the only thing we ask you is to enter one or mutiple email addresses that will receive the installation code (typically is the user that install the players) then click on SAVE
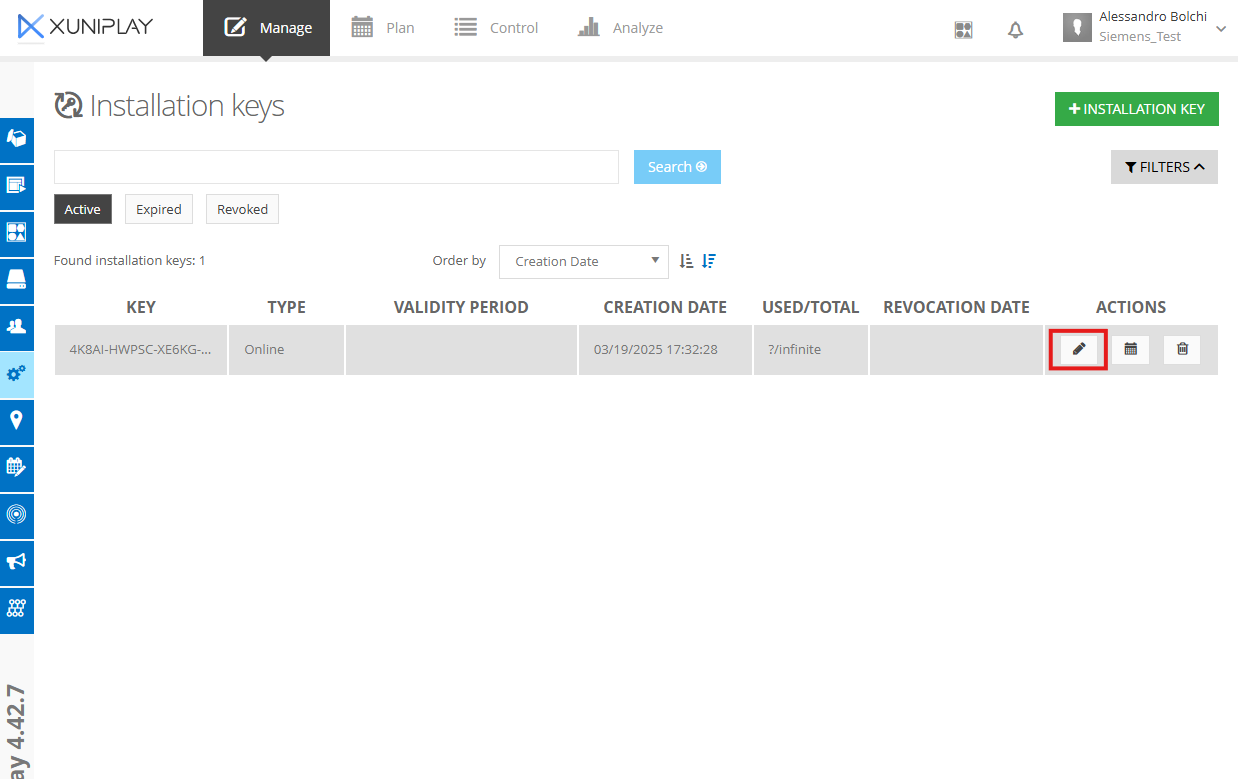
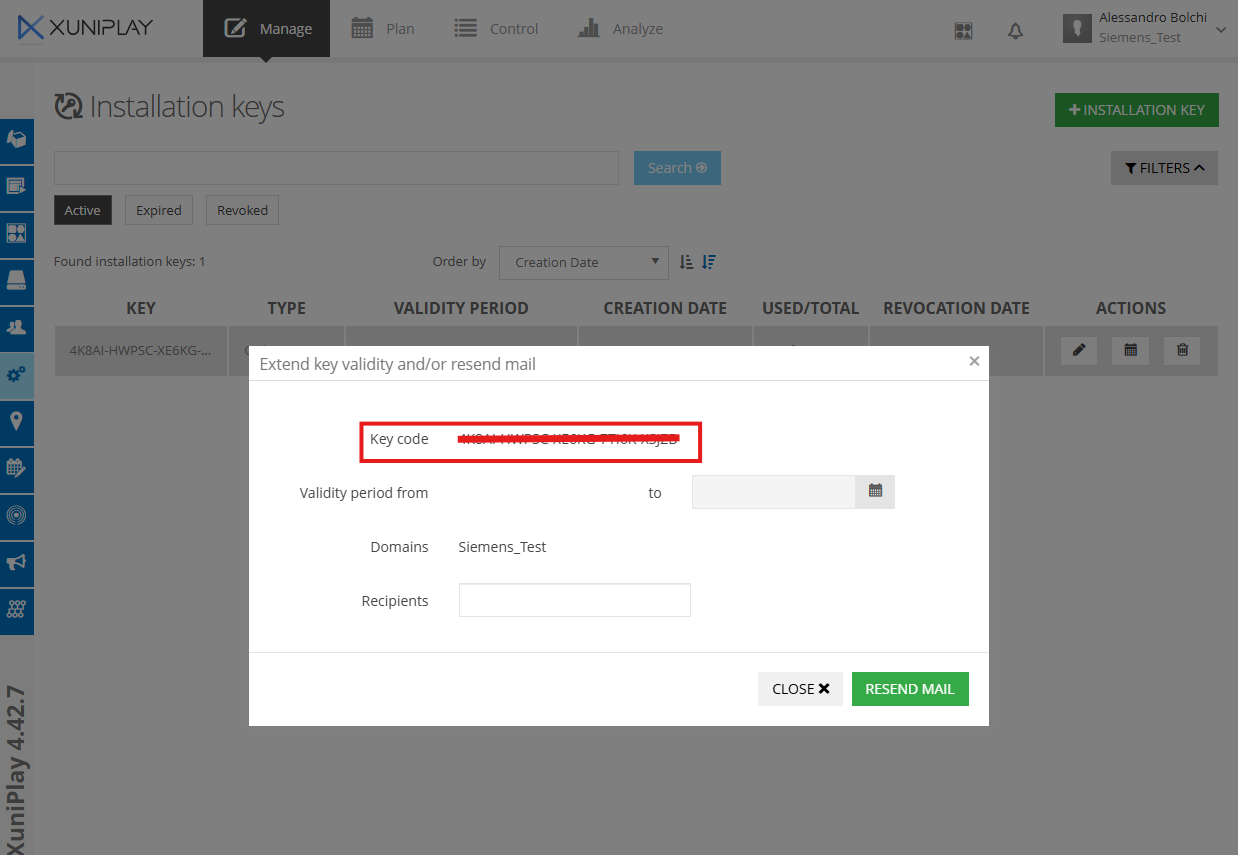
- Once you have saved you can see that the installation key is created and by clicking on the pencil you can see it entirely
¶ USB Player Installation
To create a self-installing USB stick and install a player, you need to log in to the portal http://cloud.xuniplay.com/videoportal/index.html?m=86A7E05E-0C43-45FE-92A1-0224EBC5C004
with your credentials and download the image needed for installation on the hardware used.
¶ Windows
¶ Linux
¶ XuniplayLite
If you encounter the error Error -84 is EILSEQ “illegal byte sequence”, you can refer to the solution described in this article:
https://forums.raspberrypi.com/viewtopic.php?t=274554#p1663998
-
Error -84 is EILSEQ “illegal byte sequence” returned by the SDHCI driver for CRC errors; it might be caused by an incompatible SD switcher.
-
Try disabling UHS mode along with the 1.8V change by adding the following to the end of /boot/cmdline.txt:
sdhci.debug_quirks2=4
Keep it all on one line.